When To Use High Aperture? All You Need To Know!
High aperture, also known as Higher f-stops, let less light into the camera. It is typically used in a number of situations like: landscape photography, long exposure photography, widening the depth of field, creating a starburst effect, controlling exposure in bright conditions etc.
Basically these situations aren’t fixed for high aperture. And they can change according to the photo requirements. So whether you’re a beginner or a seasoned photographer, read on to learn more about high aperture and how to use it to your advantage.
How To Select The Correct Aperture
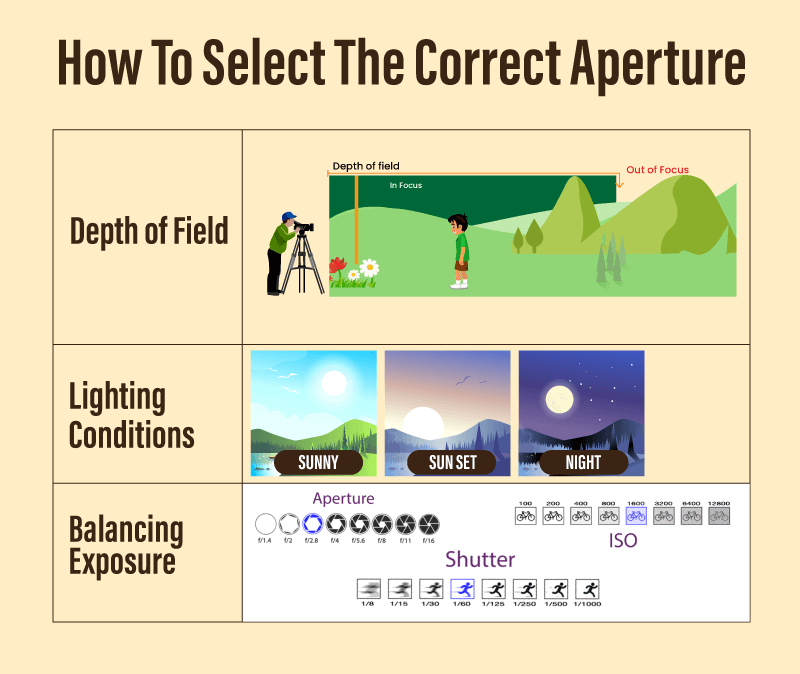
Aperture is one of the three main exposure controls in photography, along with shutter speed and ISO. It refers to the opening in the lens which allows light to pass through.
It is measured in f-stops, represented by numbers such as f/1.8, f/4, or f/16. Basically in a wider aperture (smaller f-stop number) more light can get in, which results in shallow depth of field.
But a narrower aperture (larger f-stop number) restricts the light and increases the depth of field.
So selecting the right aperture is crucial because it enhances your image composition, highlights your subject, and creates a desired artistic effect. Here are some key factors for selecting the right aperture:
Depth of Field
To choose the right aperture, you must first consider the depth of field you want in your image. For example: in portrait photography you want a blurred background to isolate the subject from distractions.
So you should choose a wide aperture (small f-stop number), such as f/1.8 or f/2.8. Alternatively if you want a landscape or group photo with everything in focus, select a narrow aperture (higher f-stop number), like f/11 or f/16.
Lighting Conditions
Depending on the lighting conditions, the aperture setting may also need to be changed.
During low light conditions, such as indoors or at sunset, a wider aperture must be needed to allow more light into the camera. It reduces the risk of blurry images and helps maintain a faster shutter speed.
On the other hand in bright outdoor situations you have to select narrower apertures to prevent overexposure and capture more details.
Balancing Exposure
Proper exposure depends on balancing aperture, shutter speed, and ISO. Even though aperture controls how much light enters the camera, it works in conjunction with other settings.
When shooting with a wide aperture, you may need to use a faster shutter speed or lower ISO to avoid overexposure.
But in narrow aperture, a longer shutter speed or higher ISO will be required to maintain proper exposure. So to achieve the desired exposure and creative effect, you will need to understand this relationship with different settings.
Desired effect
The aperture setting will also depend on the effect you want. As an example, if you would like to create a dreamy, hazy atmosphere, you have to use a wide aperture. But for a sharp and detailed image you should use narrower aperture.
When To Use High Aperture?
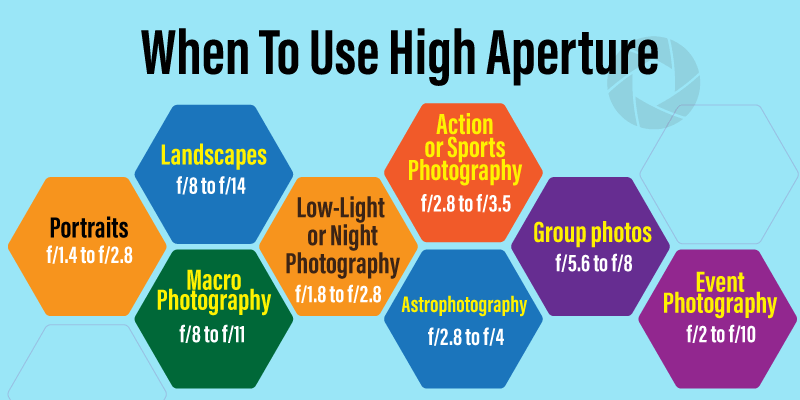
From landscape to macro photography understanding when to use a high aperture is essential for capturing the desired results.
Though low apertures are often preferred for most situations still there are times when a high aperture is necessary.
But as a beginner you might be confused. Don’t worry! because after reading this section you will be able to easily determine when or where to use high aperture.
Landscape photography
In landscape photography a higher aperture value (like: f/16 or higher) is required to make sure that the foreground and background both stay in focus at same time.
This aperture value is particularly useful when elements like: trees, rocks or buildings are needed to keep in the same frame.
Architecture photography
The main purpose of architectural photography is to capture intricate details and grandeur of buildings.
Here a high aperture value helps to ensure that. This also helps to take photos of tall buildings or entire facades.
Cityscape photography
Higher aperture value is required to capture cityscape photographs. Basically in this situation a high aperture helps to capture the vibrant and dynamic nature of an urban environment, details on the city skyline, buildings and streets.
Using this technique a photographer can emphasize various aspects of a cityscape, including architecture.
Product photography
No matter whether it’s jewelry, gadget, or food item, high aperture is essential for product photography. As these images require capturing details and textures so this higher aperture value will help.
Basically it’s essential when someone wants to showcase products in advertisements or on e-commerce sites.
Controlling exposure in bright conditions
In bright and sunny conditions, a high aperture value is an effective method for controlling sunlight.
It’s especially required if you’re photographing landscapes, architecture, or anything bright because it helps to prevent photos from being overexposed.
Macro/close-up photography
Macro, also known as close-up photography, requires a high aperture value to maintain sharpness and depth of field.
It helps to capture small objects with details, like: flowers, delicate petals and intricate patterns of an insect’s wings.
To create a starburst effect
A small aperture can also be used to create a starburst effect in photos. Using this technique enhances the overall composition and adds a touch of creativity to your images.
Tips For Capturing Image With High Apertures
Though capturing images with high aperture can create beautiful images, doing it isn’t so easy. Because for a minor mistake, an attractive image might go into vain.
Although nowadays tripods, gimbals, and other inventions have made photography easier, you can still take a perfect shot if you know how. So check out these tips on how to capture images with high aperture.
- Use a prime lens with a wide aperture
- Use a slow shutter speed
- Get close to your subject
- Switch to manual focus mode
- Use a tripod
- Raise the ISO value
- Pay attention to the background elements
- Consider a composition that compliments rather than distracts from your subject
- Shoot in aperture priority mode
- Understand the role of distance
- Try different subjects, compositions, and settings to find the style and effect that you prefer
Advantages And Limitations Of High Apertures
Though high apertures offer a number of advantages, still they also have some limitations. Here if you have a clear knowledge about it, then you will be able to use it in a great way to create stunning images.
So to help you out about this, here is a short table with their advantages and limitations.
| Advantages | Limitations |
| Greater depth of field | Reduced light intake |
| Increased sharpness and details in the image | It’s not suitable for low light photography |
| Less optical aberrations and lens distortions | Sensitivity increased to camera shake |
| Reduced lens flare and ghosting | Depth of field controls are limited |
| Achieving bokeh can be difficult |
What Is The Best Aperture For Different Situations? (Table)
Basically aperture settings for different situations vary depending on several factors, such as lighting conditions, desired depth of field, and the subject you’re photographing.
Here are some common situations and the recommended aperture settings:
| Type of photography | Recommended aperture (estimated) |
| Portraits | f/1.4 to f/2.8 |
| Landscapes | f/8 to f/14 |
| Macro Photography | f/8 to f/11 |
| Low-Light or Night Photography | f/1.8 to f/2.8 |
| Action or Sports Photography | f/2.8 to f/3.5 |
| Astrophotography | f/2.8 to f/4 |
| Group photos | f/5.6 to f/8 |
| Event Photography | f/2 to f/10 |


![How To Turn Off Ring Camera Without App? [5 Ultimate Tricks!]](https://pixelsnyc.com/wp-content/uploads/2023/08/How-To-Turn-Off-Ring-Camera-Without-App-768x380.png)