How to Remove Ruler, Guide, And Grid Lines in Photoshop
To make your editing more eye-catching, the importance of removing rulers, guides, and gridlines in Photoshop is undeniable. But as a rookie-level editor, you may not know how to do this type of editing. No need to worry about this; we are here to guide you on how to remove the ruler, guide, and gridlines in Photoshop.
Moreover, if you are new to the editing sector and don’t know even how to add those features, we have added the information on the adding process of ruler, guide, and grid. so that you can learn the A-Z details.
Pay attention to keeping yourself updated by learning about rulers, guides, and gridlines.
How To Remove The Ruler From Photoshop
About The Ruler
Making your photo precise and shaped, a ruler has no alternative, but the problem usually arises when you see that after the alignment of your object, you cannot remove the ruler, which is frustrating. Before jumping to remove the ruler, you would know where to find the ruler. The ruler is used to place the top and very left sides of your Photoshop canvas.
How To Add A Ruler
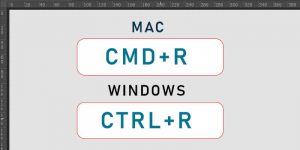
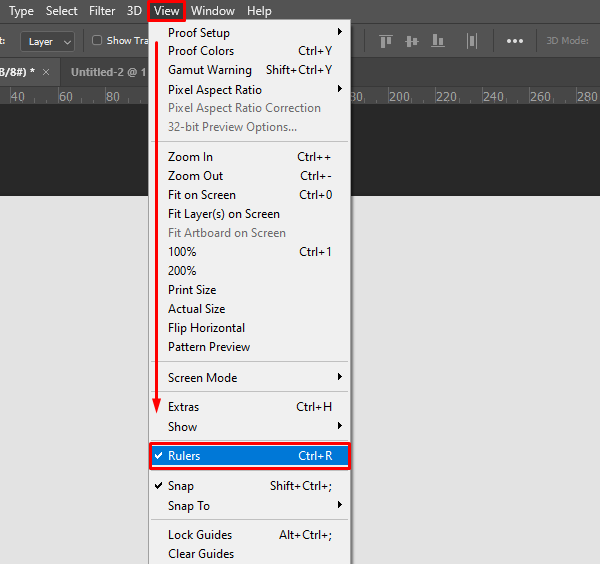
Add a ruler to your Photoshop file, just open the view menu and select the ruler. On the other hand, For your MAC, press CMD+R, and for your Windows, press CTRL+R as a shortcut process.
Removing Process
While doing editing you can drag the icon of the ruler according to your need. Now come to the point of how to remove the ruler from your editing space, you just need to press ctrl + R for Windows and Command + R for MAC
On the other hand, you can hide the ruler without removing it. just :
- Go to the view option on your Photoshop canvas.
- Remove the tick of the ruler.
- And that’s all.
How To Remove The Guide From Photoshop
About Guide
At this point, you will know what is a guide, why the guide is important, and how to remove or hide the guide from your Photoshop canvas.
The guide is mainly a combination of a few horizontal and vertical lines. During the photo editor, they have placed to position the object in the frame. You can customize the color of a guide according to your choice. The Guide works marvelously for nature photography and graphic design-related editing.
To be a professional editor, you have to know how to remove and hide the guide after finishing the work.
Steps You Need To Take Before Applying
If you want to measure the necessary guide, then I must say, the editor who uses the guide during editing confidentially can say they placed their object perfectly. However, there are a few things you should keep in mind before using the guide:
- Make the ruler visible
View > ruler
- Do not forget to use the move tools
How To Apply The Guide
Adding a guide to your photoshoot is an easy task. Just keep dragging from the ruler to create a guide. It can be both horizontal and vertical. The processing is the same.
Removing Process
If you want to remove a specific guide, simply drag it to your ruler and it will vanish; this method is useful for one or two guides, but in the case of several guides, all you need to do is:
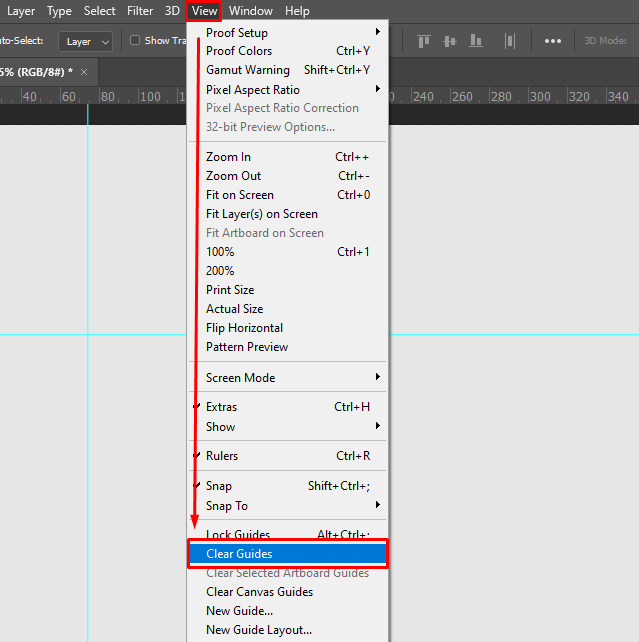
- Click on view
- Then choose the clear guide option
The benefit of this option is that it will save you time and your work will be faster. But there is an easier way, and here it is:
- For Windows, press Control +;
- For your Mac, use the command +;
How To Remove The Gridlines From Photoshop

About The Grid Line
If you are planning to edit a straight picture, or if your picture is stellar or shaky, then Grid Lines for Photoshop can help you during post-production. However, using Grid may give you the impression that you are over-editing your object, which is not the case.
But the fact is, after editing, if you do not know how to remove the grid or even if you do not know how to add a grid, we are going to inform you here.
How To Add
To add a grid to Photoshop, go to File > New > Grid.
- View
- Then show
- And lastly, select the Grid option.
How To Remove
To remove the Grid just apply the same process as the adding one. The only difference is you need to select again the Grid option. There is the shortest way to that is:
- Command + ‘ for your Mac
- Control + ‘ for your Windows
Shortcut Of These Three Features
- Hide and Show Ruler: Command + R for your Mac, Control + R for your Windows
- Hide and Show Ruler: Command +; for your Mac, Control +; for your Windows
- Hide and Show Ruler: Command + ‘ for your Mac, Control + ‘ for your Windows
To conclude, Removing Rulers, Guide, And Grid Lines in Photoshop is the very basic level of editing. So before the attempt at professional editing, you should follow the guide that we gave you through these guidelines. Hopefully, it will help you.