How To Retouch Skin In Photoshop
Learning how to retouch skin in Photoshop is a lot more rewarding. Because you get to clean out skin blemishes and spots from the image super fast. We have tested out Photoshop skin retouching tricks and it gave us incredible results on images. Let’s explore the skin retouching tutorials that work the most.
The best part is, that we have explained Photoshop retouching tutorials for beginners. It would let you follow the entire step-by-step guide a lot faster. In case you need high-end skin retouching, use advanced technology to get better results on images.
How To Retouch Skin in Photoshop
Let’s learn how to retouch skin using Photoshop in beginner friendly and advanced ways. Both of the processes give you great results in Photoshop face retouching tasks as well. Either way, you must follow certain steps to complete the retouching project.
Spot Healing Brush Tool Technique
In the following tutorial, we will use a healing brush tool to retouch skin.
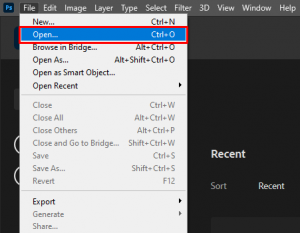
Step 1: First, open your image in Photoshop.
Step 2: Afterword press “Alt” and click on the main image layer. While clicking on the image layer, drag your mouse to the New Layer icon down at the layer panel.
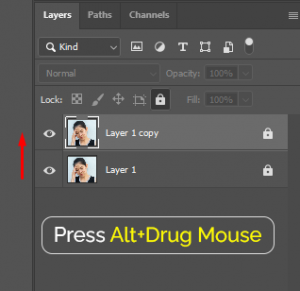
Note: If you want to rename the new layer, type it in the Name field and click “OK”.
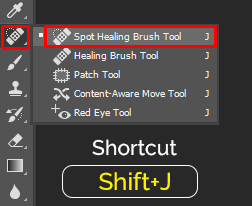
Step 3: Once you duplicate the image layer, select the Spot healing brush tool. It’s located in the left toolbar of Photoshop. Or you could keep pressing shift + J until you get the tool.
Step 4: Now set the brush to “Content-Aware” Type from the top panel.
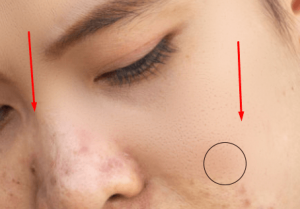
Step 5: Use “[“and “]” to increase or decrease the brush size. Adjust the Photoshop spot healing tool brush size according to the pimple and dark spots. Make your brush size big enough to cover the pimples, and dark spots.
Step 6: After you adjust the brush size, zoom into the skin area you want to retouch. Hover your mouse onto the skin spots and click once. Photoshop would sample surrounding areas of skin to replace pimples and dark spots.
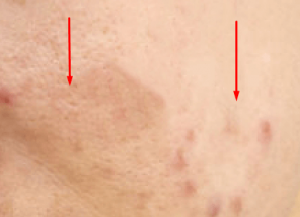
Note: If the skin issue doesn’t get solved with one click, try to click on the place several times until the spots vanish.
Advanced Technique: Using High Pass Filter
Once you complete the initial retouching, you can go onto the advanced version of the tutorial. Below we are exploring the advanced process of professional skin retouching in Photoshop. So, let’s start the tutorial right now.
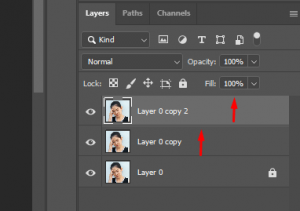
Step 1: First you need to make two duplicate layers of the same image. Simply press Alt click on the layer and drag it to the new layer icon in the Photoshop layer panel. Do it twice to get 2 new image layers
Step 2: Afterward, apply Gaussian blur at the bottom layer. you need to go to the filter menu > Blur > Gaussian Blur.

Enter 15 at the Gaussian blur at the appearing dialog box. Click on the OK button.

Step 3: Now select the upper layer and go to the Filter menu > Other > High Pass.
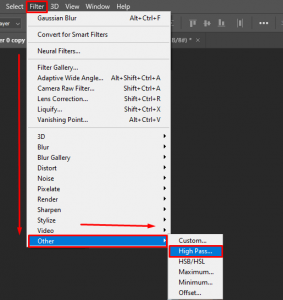
Step 4: A dialog box will appear for the High pass filter. Now you need to choose the radius value for the high pass filter. Enter the radius value 1.5 on the High Pass dialog box. Press the OK button to confirm the blur effect.

Step 5: Make sure you have selected the correct layer. Afterward, go to the Layer Blend mood. Choose “Vivid light” as layer mode from the appearing drop-down menu.
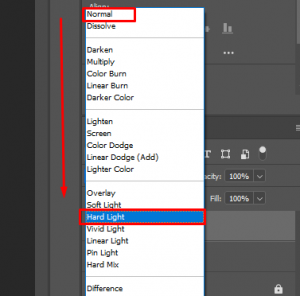
Note: The opacity of the layer blend mood must be at 100%.
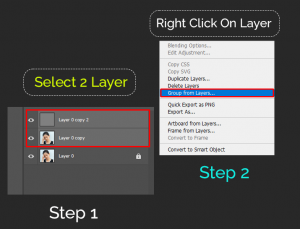
Step 6: At the following stage, you need to merge the layers into one before going to the next steps. To do so, select both of the layers while pressing the shift key. Once you select both of the layers, right-click on any of the selected layers. Select the “Group from Layers” option.
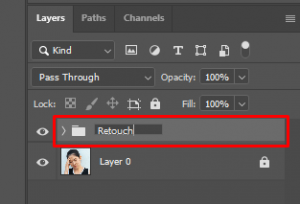
Step 7: Give the new layer a name and click on the “OK button.
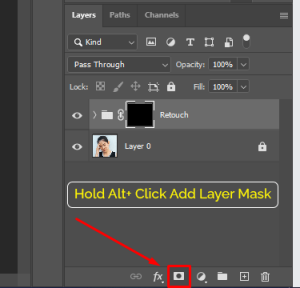
Step 8: Now click on the clipping mask icon while pressing the Alt key on the keyboard. The icon is located at the bottom part of the Photoshop layer panel. It adds a new layer with masking features.
Step 9: Afterward select the brush tool from the left toolkit panel. At the brush setting the hardness should be at a low value. The opacity of the brush should be at 100% as well.
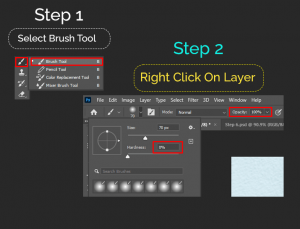
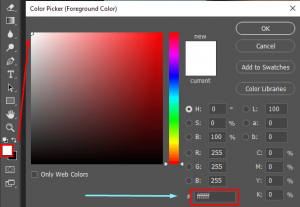
Step 10: Make sure the foreground swatch is set to pure white. You only need to double-click on the swatch and select the pure white color from the window.
Step 11: Now brush off the pimples and dark spots in Photoshop. Take your time and don’t rush while brushing.
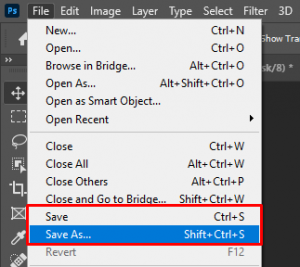
Step 12: Once you are done save the image and its changes.
Things To Remember When Retouching Skin in Photoshop
Once you learn how to retouch photos in Photoshop, you need to keep a few things in mind. These would help you to avoid any issues while retouching your skin. Below we have listed a few of the aspects that you should keep in mind.
- When you retouch skin, make sure to zoom in on the skin area.
- Always try to work on retouching details of the skin rather than brushing the whole skin area at once.
- Before performing skin retouching, always duplicate the current image layer. Keep an intact image layer as a backup.
You can also check this video tutorial about photo retouching
FAQS on Skin Retouching in Photoshop
Let’s answer some of the common answers related to the skin retouching tasks in Photoshop.
How To Retouch Skin With A Few Clicks?
To retouch skins with a few clicks, you could use the spot healing tool. It lets you remove pimples and dark spots of skin with a few clicks. In case you need to automate the whole process, use skin retouching plugins.
When Should You Use a High Pass Filter?
Among the advanced techniques, the High pass filter is one of the most popular ones. It removes skin issues from images a lot faster. Moreover, it uses a clipping mask to provide you with flexible retouching.
What Are the Best Plugins to Retouch Skin in Photoshop?
If you want to use the best Photoshop skin retouching plugin, Portraiture would be the best one. Although it’s a free plugin, a paid retouching script can help you out. If you want to opt for the paid plugin, Retouch Ninja would be great.
Conclusion
Mastering the craft of how to retouch skin in Photoshop is essential to get better images. It lets you brush away dark spots from your images a lot faster. Even if you are a portrait photographer, the retouching process would make your images polished.
To get professional skin retouching in Photoshop, try to learn the process or use services. Either way, a proper retouching process is a must to get a great-looking image. If you are offering photography services, make sure you have retouched each photo. It would improve the look and feel of the image a lot faster.